Using Terahertz Technology to Measure Total Thickness of Manufacturing Materials
Following a successful trip toTire Tech Expo last monthhere’s a closer look at the ability of Terahertz measurement to perform an on-demand on-production material property check to ensure the THz measurement remains accurate. Especially through material batch changes, shift changes, production stops / restarts and new product starts.
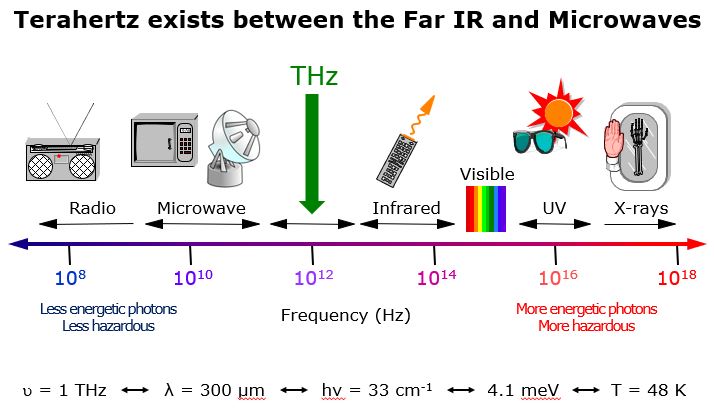
太赫兹radiationis part of the electromagnetic spectrum lying between microwaves and the far-IR. This region has frequencies ranging from 0.1 – 10 THz and wavelengths from 3 mm to 0.03 mm. This spectral region is often referred to as the “Terahertz gap” as these frequencies fall between electronic (measurement of field with antennas) and optical (measurement of power with optical detectors) means of generation. Historically, little study of the interactions between these wavelengths and matter has been undertaken. The reason for this was the difficulty in generating and detecting terahertz frequencies. Recent advances in combining optical and electronic methods have allowed for generation and detection of very high signal-to-noise ratio and high data acquisition rates of 0.1 – 3 THz.

大多数材料,尤其是聚合物和其他马努factured materials, can be relied on to be very consistent and thus have the same material properties. In tire manufacturing, gum rubber is a relatively unusual material in that it is derived from many sources, both natural rubber sources and recycled material sources. Thus, consistency in the exact formulation of the rubber product is difficult to guarantee. Tire manufacturers undertake extensive multiple processing steps to ensure the material is uniform, but small changes in the mixed material properties are possible.
For thickness measurement, the most important property is the Refractive Index (RI) of the material. While this term sounds complicated, it is simply the ratio of the Speed-of-Light (in vacuum) to the velocity-of-light of the THz pulse (through a material). Electromagnetic energy (i.e., light) always slows down when passing through matter. For a consistent material (e.g., polymer), determination of the RI value takes less than 2 minutes and only needs to be done once ever.
However, there was a concern that this property value could vary for a natural product. Variation in this value would lead to accuracy errors. Thus, this 2-minute check needs to be performed in real-time on-line on the exact material being produced. For THz, there is a simple method to do so.
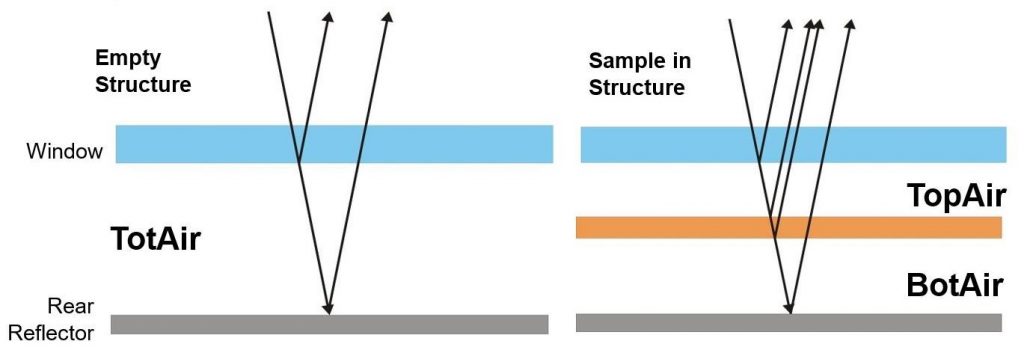
By adding a window between the sample and the sheet and a metal reflector behind the sheet, it is possible to make two THz measurements (one of the empty structure, and one when the sheet is present) to determine the sheet total thickness without needing any calibration. From these two measurements it is straightforward to find the instantaneous value for RI for the product being manufactured.

The Empty structure needs to be measured to calculate the “thickness” of the air layer between the window bottom and rear reflector surface (TotAir). This value needs to be stored.
When the structure moves on sheet, then two air layers are created; one between the window and sheet (TopAir) and one between the sheet and rear reflector (BotAir).
The thickness of the sample is then:
Sample Thickness = TotAir – TopAir – BotAir
Thus, the thickness of the sample is now known without any knowledge the sample material properties. From this thickness value, the Refractive Index can be immediately calculated. With the RI value, guaranteed accurate thickness measurements are obtained. This structure is set up on the scanning frame and can be run on demand or on schedule as set by the operators.
Other topics discussed considered the measurement of cord spacing with the ply sheet, especially the distance from the last cord to the gum sheet edge. This would be a new application for THz inspection and is being considered now.
For more information on howTeraMetrixis using terahertz technology in tire manufacturing please download our application note oncalendering.